Free Knitting Pattern
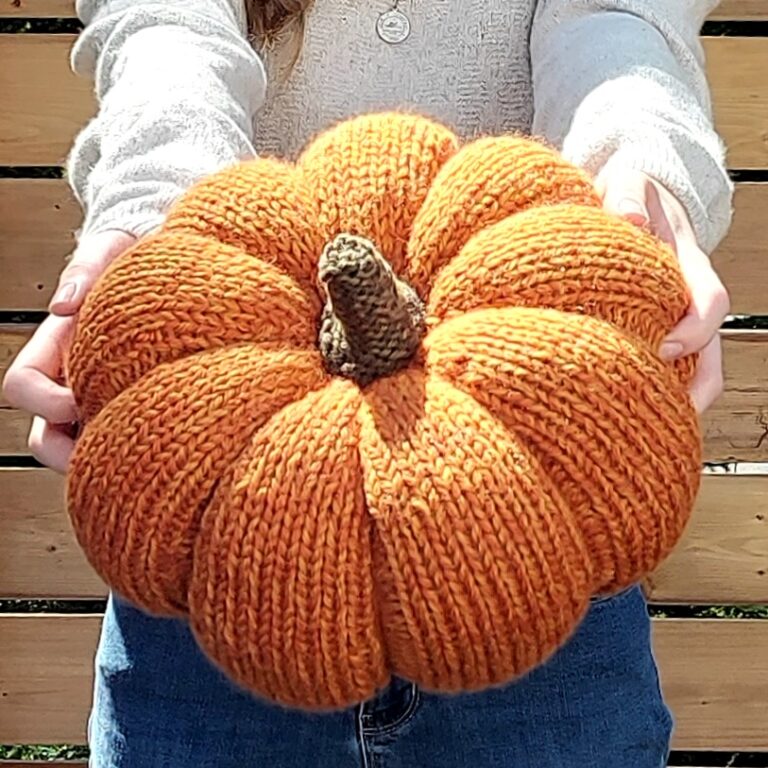
Knit up with 2 strands of worsted weight wool, this pumpkin beanie is oversized and so much fun. I really love a big chunky beanie look when I am knitting up a themed hat and I absolutely love mixing colours. With a rolled rim and a stem and leaf up top, this one will look awesome in all of your fall photos at the orchard, corn maze or pumpkin patch. This free knitting pattern includes sizes for the whole family.
I ordered an orange wool last year with the plan to make a few pumpkin beanies for my Etsy Shop. It was Paton’s Classic Wool in the colour Pumpkin, I thought with that name it would be perfect. When the wool arrived I totally loved the colour but I found it was a little too bright for the design I had in mind, it was more like the inside of a pumpkin. I really wanted something more earthy, so it went into my stash to wait for something else.

After knitting up those cute stuffed pumpkins last month with the double strands I had the idea for the Chunky Pumpkin Roll beanie. I took that bright orange wool out and found the perfect colour to marl it. I mixed it with one of my favourite colours from Knit Picks Wool of the Andes worsted, Persimmon, which is an awesome earthy brownish orange ginger shade. The marling of the two colours together is so perfect and gives the beanie more visual texture and depth that will look amazing in fall photos.
The beanie is finished with a simple stem and small leaf on the top. I mixed a dark forest green colour with a dark olive, they are very close in shade but different enough to continue the marled look through the beanie.

This pattern knits up quick and easy. It is lovely with or without the leaf. Please note the size specific instructions for the decreasing rounds. I separated the leaf instructions by size for simplicity. Comment if you have any question or see any areas for improvement in the pattern. I hope this one becomes a fall favourite for you.
The Pattern
Sizes
XS (Small, Medium, Large)
XS / Baby: 17″ (43 cm) circumference, 6″ (15 cm) long
Small / Toddler, Small Child: 19″ (48.5 cm) circumference, 7″ (18 cm) long
Medium / Child large, Adult Small: 21″ (53.5 cm) circumference, 8″ (20.5) long
Large / Adult Medium, Large: 23″ (58.5) circumference, 9″ (23 cm) long
Note: length is measured with the rim rolled up and does not include the stem. If you need an in between size, knit the smaller size and add a couple more of the ribbed rounds before decreasing. These beanies have a good stretch.
Yarn and Materials
Main Colour (MC) – 2 strands of Worsted Weight Wool in Orange and Ginger shades (4 – medium)
I used Patons Classic Wool in Pumpkin and Knit Picks Wool of the Andes in Persimmon
60-110 yards of each colour depending on size
Contrast Colour (CC) – 2 strands of worsted weight wool in dark green shades (4 – medium)
I used Patons Classic Wool on Deep Olive and Knit Picks Wool of the Andes in Larch Heather
Small amount of each
Needles and Tools
US10 (6mm) 16″ circular needle
US11 (8mm)16″ circular needle
Set of US10 (6mm) Double Point Needles
Stitch Marker
Darning Needle
Gauge
4″ = 12 stitches in stocking stitch with US11 (8mm) needles
Abbreviations
CC – Contrast Colour
CO – Cast On
DPNs – Double point needles
K2tog – (Knit 2 together) Decrease one by knitting the next 2 stitches together
KFB – (Knit front and back) Increase one stitch by knitting into the front and back of the next stitch
KFBF – (Knit front, back and front) Increase two stitches by knitting into the front, then back, then front of the next stitch
MC – Main Colour
P2tog – (Purl 2 together) Decrease one by purling the next 2 stitches together
RS – Right side
SSK – (Slip, slip, knit) Decrease one by slipping the next 2 stitches knitwise, slip the left needle through the front of both loops and knit them together
SSP – (Slip, slip, purl) Decrease one by slipping the next 2 stitches purlwise, slip the left needle through the back of both loops and purl them together
WS – Wrong Side

Instructions
CO 45 (54, 63, 72) with US10 (6mm) circular needle with 2 strands of worsted weight wool in MC, place marker and the join round
Knit 9(10, 11, 12) Rounds
Switch to US 11 (8mm) circular needle
Next Round: K4(5, 6, 7) P1
Repeat this row 15(17, 19, 21) more times
Begin Decrease Rounds
Size Specific Instructions Start Here
Large Size Only
Next Round: [K5, K2tog, P1] repeat to end
Next Round: [K6, P1] repeat to end
Medium (Large size continue here)
Next Round: [K4, K2tog, P1] repeat to end
Next Round: [K5, P1] repeat to end
Small (Large and Medium sizes continue here)
Next Round: [K3, K2tog, P1] repeat to end
Next Round: [K4, P1] repeat to end
XS (all other sizes continue here)
Next Round: [K2, K2tog, P1] repeat to end
Next Round: [K3, P1] repeat to end
Next Round: [K1, K2tog, P1] repeat to end
Next Round: [K2, P1] repeat to end

Stem
Switch to US10 (6mm) Double Point Needles and Stem Colours
Next Round, first needle, with stem colours: [K2tog, K1] x3
Repeat for the second and third needle
Next Round: [K2tog] repeat to end
Next Round: [K1, K2tog] repeat to end (6 stitches)
Knit 5(6, 7, 8) rounds
Next Round: Purl
Next Round Knit
Cut yarn and run through the remaining stitches with a darning needle, pull them together and run through the center to the inside of the stem. Sew a couple stitches to secure and weave in the loose end.
Weave in remaining loose ends. Tip: do not trim the loose ends from the stem, instead you can push them into the stem for stuffing.
Leaf
Using US10 (6mm) straight needles (or 2 DPNs) with two strands of yarn, same colours used for the stem, follow the instructions below for your size
XS Leaf
Pick up and knit 3 stitches on the base of the stem
Row 1 (WS): P1, KFBF, P1 (5 stitches)
Row 2 (RS): K2, P1, K2
Row 3: P1, KFB, K1, KFB, P1
Row 4: K3, P1, K3
Row 5: P1, K5, P1
Row 6: K3, P1, K3
Row 7: P1, SSK, K1, K2tog, P1
Row 8: SSK, P1, K2tog
Row 9: P1, P2tog, slip the first stitch over the second, cut the yarn and pull it through
Small Leaf
Pick up and knit 3 stitches on the base of the stem
Row 1 (WS): P1, KFBF, P1 (5 stitches)
Row 2 (RS): K2, P1, K2
Row 3: P1, KFB, K1, KFB, P1
Row 4: K3, P1, K3
Row 5: P1, K5, P1
Row 6: K3, P1, K3
Row 7: P1, K5, P1
Row 8: K1, SSK, P1, K2tog, K1
Row 9: SSP, K1, P2tog
Row 10: K1, K2tog, slip the first stitch over the second, cut the yarn and pull it through
Medium Leaf
Pick up and knit 5 stitches at the base of the stem
Row 1 (WS): P1, KFB, K1, KFB, P1
Row 2 (RS): K3, P1, K3
Row 3: P1, KFB, K3, KFB, P1
Row 4: K4, P1, K4
Row 5: P1, K7, P1
Row 6: K4, P1, K4
Row 7: P1, SSK, K3, K2tog, P1
Row 8: K3, P1, K3
Row 9: P1, SSK, K1, K2tog, P1
Row 10: SSK, P1, K2tog
Row 11: P1, P2tog, slip the first stitch over the second, cut the yarn and pull it through
Large Leaf
Pick up and knit 5 stitches at the base of the stem
Row 1 (WS): P1, KFB, K1, KFB, P1
Row 2 (RS): K3, P1, K3
Row 3: P1, KFB, K3, KFB, P1
Row 4: K4, P1, K4
Row 5: P1, K7, P1
Row 6: K4, P1, K4
Row 7: P1, K7, P1
Row 8: K1, SSK, K1, P1, K1, K2tog, K1
Row 9: P1, K5, P1
Row 10: K1, SSK, P1, K2tog, K1
Row 11: SSP, K1, P2tog
Row 12: K1, K2tog, slip the first stitch over the second, cut the yarn and pull it through
Finishing
Weave in loose ends
Wash and block
© 2021 Heather Pelletier – Handknit Hugs
Do not copy, re-distribute or sell this pattern either in whole or in part.
You may sell products made from this pattern – credit would be appreciated.

I hope you’ve enjoyed this pattern and are busy knitting one up for everyone in your family. Please comment below if you have any questions or feed back. I would love to see your finished pumpkin beanies. Share your projects on Ravelry or tag me on Instagram @handknithugs #chunkypumpkinrollbeanie