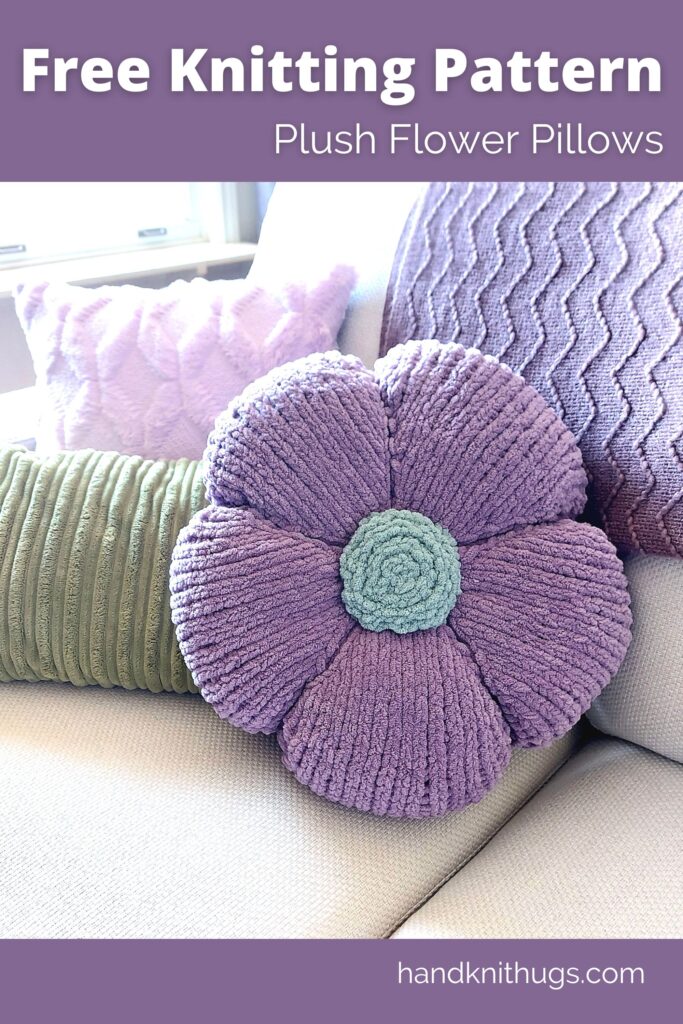
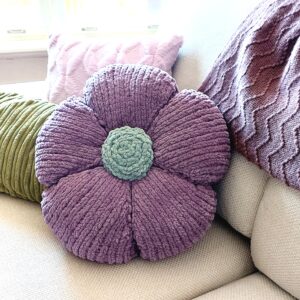
Knit Flower Pillow – Free Knitting Pattern
This plush flower pillow will bring fun spring and summer vibes to your cozy living space.
Affiliate Statement:
Hey Readers, the following post contains affiliate links. I may receive a small commission if you click and purchase from one of these links (which honestly, I’ll probably use to buy more yarn and design more awesome patterns to share with you). I only recommend products that I already use and love, thank you so much for your support.
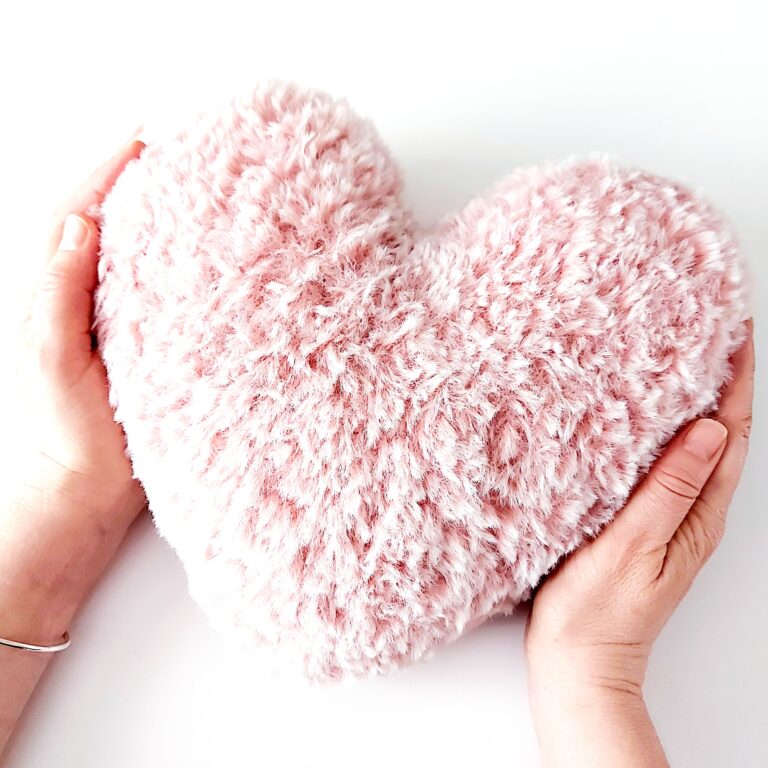
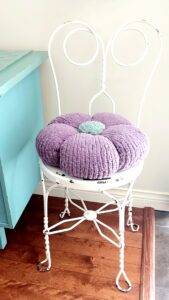
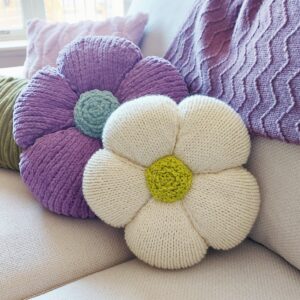
The main part of the pillow is knit up in the round, one piece, with a super bulky chenille yarn, then stuffed and wrapped with yarn to flatten it out and resemble the petals of a flower. The center piece is knit separate and sewn in place with a little more stuffing added.
I bought a new couch for my family room this year and have been wanted to add some splashes of colour to the space. I have been seeing a lot of fun shaped pillows lately and am loving this trend.
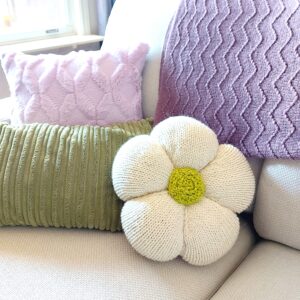
My first run at this pattern was knit up with two strands of worsted weight wool with US10 neddles. While I really liked the finished pillow, I was really looking for something bigger and definitely cuddlier! I had been wanting to try one of those plush blanket yarns for a while and this was the perfect project. So, the pillow (take 2) was knit up with Bernat Blanket yarn (affiliate link – see statement above) and I am so happy with the result. It is a super bulky chenille effect yarn that comes in big skeins with lots of yardage. The pillow worked up fast into a big, 16” wide, 4” thick, super soft and snuggly, perfect flower.
I am really enjoying this plush yarn and my cute new pillow. I feel like I should add to the collection. Any suggestions? Maybe a succulent pillow next? Let me know what you think
I can’t wait to see all the different versions of this flower pillow. Please share your pics on Ravely and Instgram. I hope you enjoy the pattern!
– Heather
The Pattern
Size
16” wide
4” thick
Yarn and Materials
Bernat Blanket affiliate link – see statement above
MC: Shadow Purple
150 yards (137 m)
CC: Misty Green
small amount
Poly-Fil – approximately 225 grams
Needles and Tools
Set of US10.5 (6.5mm) Double Point Needles
US10.5 circular needle – 16”-24”
Stitch Marker
Removable Stitch Marker
Darning Needle
Gauge
4” = 9 stitches
Abbreviations
CO – Cast On
DPNs – Double point needles
K2tog – (Knit 2 together) Decrease one by knitting the next 2 stitches together
KFB – (Knit front and back) Increase one by knitting into the front and back of the next stitch
M1 – (Make one stitch) For this pattern you will picking up and knitting a new stitch in the leg of the next stitch on the left hand needle. This is also called a RLI (Right Lifted Increase)
Sl1 – slip the next stitch
SSK – (Slip, slip, knit) Decrease one by slipping the next 2 stitches knitwise, slip the left needle through the front of both loops and knit them together
Instructions
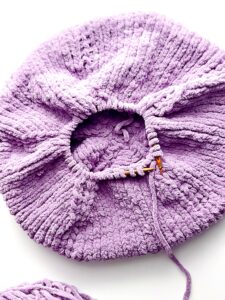
CO 5 stitches using US10.5 (6.5mm) DPN with main colour (MC)
KFB x5
Split across DPNs (4, 4, 2) stitches and join round
Next Round: Knit
Next Round: KFB x10
Next Round: [K3, P1] repeat to end
Next Round: [K1, M1, K1, M1, K1, P1] repeat to end
Next Round: [K5, Sl1] repeat to end
Next Round: [K1, M1, K3, M1, K1, P1] repeat to end
Next Round: [K7, Sl1] repeat to end
Next Round: [K1, M1, K5, M1, K1, P1] repeat to end
Next Round: [K9, Sl1] repeat
Next Round: [K1, M1, K7, M1, K1, P1] repeat to end
Next Round: [K11, Sl1] repeat to end
Next Round: [K1, M1, K9, M1, K1, P1] repeat to end
Next Round: [K13, Sl1] repeat to end
Switch to circular needle when needed
Next Round: [K1, M1, K11, M1, K1, P1] repeat to end
Next Round: [K15, Sl1] repeat to end
Next Round: [K1, M1, K13, M1, K1, P1] repeat to end
Next Round: [K17, Sl1] repeat to end
Begin repeat rounds – add removeable stitch marker here to better count rounds
Round 1 – [K17, P1] repeat to end
Round 2 – [K17, Sl1] repeat
Repeat these 2 rounds 15 times (total 30 rounds)
Begin Decrease Rounds
Next Round: [SSK, K13, K2tog, P1] repeat to end
Next Round: [K15, Sl1] repeat to end
Next Round: [SSK, K11, K2tog, P1] repeat to end
Next Round: [K13, Sl1] repeat to end
Next Round: [SSK, K9, K2tog, P1] repeat to end
Next Round: [K11, Sl1] repeat to end
Next Round: [SSK, K7, K2tog, P1] repeat to end
Next Round: [K9, Sl1] repeat to end
Switch to DPNs
Next Round: [SSK, K5, K2tog, P1] repeat to end
Next Round: [K7, Sl1] repeat to end
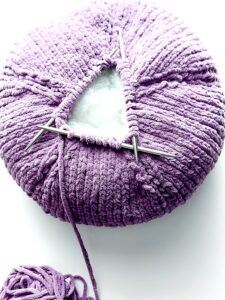
Add Stuffing, working handfuls into the petal areas until you get a nice round shape. Do not over stuff.
Next Round: [SSK, K3, K2tog, P1] repeat to end
Next Round: [K5, Sl1] repeat to end
Next Round: [SSK, K1, K2tog, P1] repeat to end
Top up stuffing if needed
Next Round: [K2tog] repeat to end

Cut yarn leaving about a 6-8 foot tail to wrap the petals.
Run the yarn through the remaining stitches and pull to close the hole.
Start wrapping the petals. Run the yarn along a purl rib line and up through to the bottom center through to the top center. Tug gently so the yarn disappears in the rib. Continue with a rib line on the opposite side of the pillow and until all petals have been wrapped. Sew a couple stitches in the top center and tie off with a triple knot. No need to trim the extra yarn, you can leave it for stuffing.
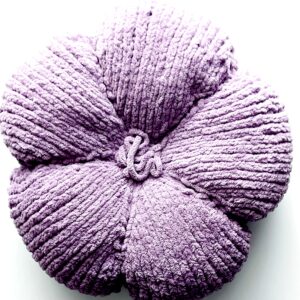
Flower Center
CO 5 with contrasting colour (CC)
KFB x5
Split across DPNs (4, 4, 2) stitches, join round
Next Round: KFB x10
Next Round: Knit
Next Round: [K1, KFB] repeat to end
Next Round: Knit
Bind off all stitches. Cut yarn leaving an approximate 36” tail.
Note: The purl side is the right side
Use the cast on tail yarn to close center gap. Weave in loose end
Use the bind off tail yarn to sew a stitch to close/complete the bind off edge.
Center on the pillow, purl side facing out, and sew in place with the bind off tail yarn. Add a small amount of stuffing before sewing to the last petal. Weave loose ends into the pillow

© 2024 Heather Pelletier – Handknit Hugs
This pattern is for personal, non-commercial use only.
Do not copy, re-distribute or sell this pattern either in whole or in part.
You may sell products made from this pattern – credit would be appreciated.
Thanks so much, I hope you have enjoyed this pattern! I would love to see your finished flower pillows. Share a photo on Ravelry or Instagram.
Check out my blog for more free patterns and inspiration